Chromebooks have become increasingly popular recently because of their easy-to-use interface, reasonable cost, and smooth compatibility with Google services. Among the various important tasks that users often need to perform, capturing screenshots is essential. Many users wonder how to take a Screenshot on Chromebook.
Whether you need to save crucial information, share an intriguing image, or address a technical problem, understanding the process of taking screenshots on a Chromebook is crucial. There are several ways through which you can take screenshots on Chromebook. Recently, Google introduced a screenshot tool that helps you take screenshots and record your Chromebook.
In this article, we’ll tell you how to take a screenshot on Chromebook.
How To Screenshot On Chromebook?
Before we talk about taking screenshots on Chromebook, it’s important to know how many ways we can take screenshots. Chromebooks have two basic methods for taking screenshots: using keyboard shortcuts or the built-in screenshot tool. We will discuss both methods so you have comprehensive knowledge about the topic.
1. With A Keyboard:
The first and foremost method to take screenshots on Chromebook is using the keyboard. You can press keyboard shortcuts to take a screenshot of the whole screenshot or any part of it.
Method 1: Screenshot of the complete screen:

Many users wonder how to take a partial screenshot on Chromebook. The process is pretty simple if you want to screenshot the complete screen. Locate the Ctrl and Show Windows buttons on your keyboard. The Show Windows button is typically represented by a square or rectangle icon, resembling multiple windows or tabs.
This is usually present in the upper part of the keyboard, as shown below. Once you’ve located the buttons, press the Ctrl and Show Windows keys simultaneously. Your Chromebook will capture the screenshot, and you’ll find the saved image in the “Downloads” folder.
Method 2: Screenshot of Partial Screen
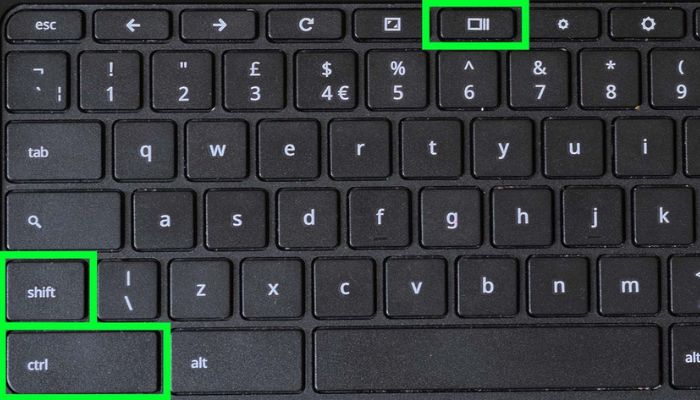
If you only need to capture a specific screen area, use the following keyboard shortcuts. The screenshot on the Chromebook shortcut is pressing Ctrl + Shift + Show Windows simultaneously. The screen will dim, indicating that you can select the desired area.
Click and drag your cursor to create a rectangle around the area you wish to capture. Release the click, and your Chromebook will capture the selected portion as a screenshot. In this case, your screenshot will also be saved in the My Files/Downloads area.
The screenshot will also be copied to the clipboard in both cases mentioned above. So, you’ll have the option to paste the screenshot to paint or slides directly.
2. Screenshots Using The Quick Settings Menu:
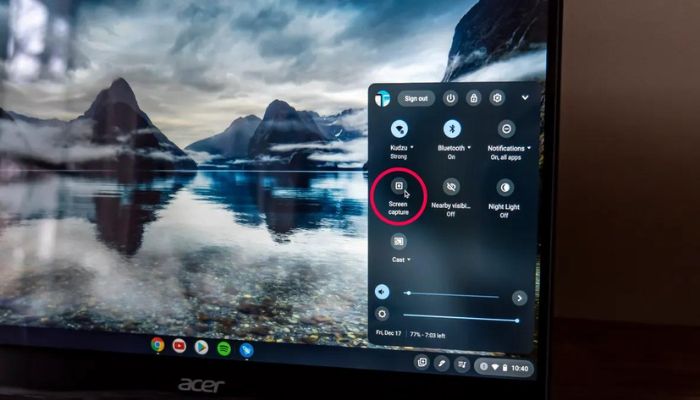
Apart from keyboard shortcuts, Chromebooks also provide a built-in screenshot tool. This tool is located in the Quick Settings menu. Many users ask how to screenshot on Chromebook without Windows key. You can open the quick settings menu if you don’t want to use the Windows key.
To open the Quick Settings menu, click on the time in the bottom right corner of your screen. Then, click on the Screen Capture button. A keyboard shortcut can also bring up this built-in screenshot tool. First, simultaneously hold down the Ctrl and Alt keys on your keyboard. Then, press the Show Windows key. This will bring up the quick settings menu.
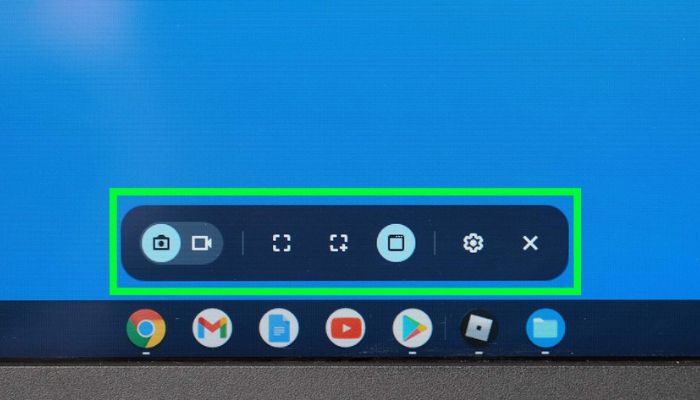
Once you perform the aforementioned key combination, a small menu will appear at the bottom of the screen, presenting various icons from left to right. These icons include:
- Screenshot (for capturing still images)
- Screen recording (for recording videos)
- Take full-screen screenshot
- Take a partial screenshot (a crosshair icon will be displayed; click and drag it to highlight the desired portion of the screen, then click the Capture button in the center of the screenshot)
- Take Windows screenshot (specifically for capturing a single window)
- Settings
3. Using Third-Party Apps:
If you’re looking for more advanced features or additional screenshot options, you can explore third-party apps available on the Chrome Web Store. Some popular apps include “Nimbus Screenshot & Screen Video Recorder” and “Lightshot.” These apps offer extended functionalities like capturing scrolling web pages, adding annotations, and instantly sharing feature of screenshots or recordings.
Tips And Tricks To Take Screenshots On Chromebook:
Here are some other hints to improve your Chromebook screenshot-taking experience:
- You may use the keyboard shortcut Ctrl + Shift + V immediately after capturing a screenshot to save it directly to your Downloads folder. This shortcut bypasses the normal screenshot notice and automatically saves the image to the selected folder.
- After capturing a screenshot, press the keyboard shortcut Ctrl + O to open it in a new tab. This will open the screenshot in a new tab for your preview.
- On a Chromebook, sharing screenshots is very easy. Drag the screenshot file to a file-sharing site like Google Drive or Dropbox. This lets you instantly upload and share the photograph with others.
You may improve your screenshot process on your Chromebook by using these additional methods, saving time and effort when collecting and organizing your visual content.
Conclusion:
Taking a screenshot on Chromebook is a quick and easy process. You may easily save and share screenshots of your screen using keyboard shortcuts or the built-in screenshot tool. We hope this article helps you. In case of any doubt, feel free to comment in the comment section below. Happy Sceenshotting!


